Posture

Back Pain

Got back pain? Pay attention to this muscle

By: Dr. Alyssa Musgrove


If you, or someone you know, is always searching for back pain relief, it may be time to examine the psoas muscle. I work on the psoas (pronounced SO-as) muscle every day with my patients. Many people have not heard of this muscle, yet it is a major player when it comes to back pain, especially when there is difficulty straightening up from a seated position.


The psoas is a rope-like muscle that attaches to all the low back bones (lumbar vertebra), runs down across the groin and attaches to the inside of the hip. The psoas is joined at the hip, literally, by the iliacus, which travels from hip to thigh. Together, the psoas and iliacus make up the iliopsoas – the body’s most powerful hip flexor. The psoas helps promote good posture and stabilizes your abdomen and pelvis as it works together with your abs, obliques and lower back muscles. Every time you stand, walk, or run, or play golf, you’re engaging the psoas.


When the psoas is weak or tight, it can cause symptoms such as pain across the lower back, groin pain, hip pain, pain in the buttocks, difficulty walking up stairs or hills, tight hamstrings, knee pain and even foot pain.


John Stiner, a massage therapist based in Durham, N.C., whose credentials include a 2008 stint with the Nike Oregon Project, has noticed an epidemic of psoas tightness among his running clients. The number one culprit, he says, is your chair. Sitting for long periods puts the psoas in a perpetually shortened state. The muscle has memory and will maintain this shortened state, even when you get up from your chair. “Our bodies simply aren’t designed to sit all day,” says Stiner.


Another cause of imbalanced psoas muscles are abdominal crunches. Performing too many sit-ups causes the psoas muscle to shorten, which can lead to an increased arch in the lower back and a head-forward posture. While this posture is normally seen in the elderly population, nowadays, we are seeing this type of posture in younger people.  Rather than just focusing on abdominal exercises, it is better to have a more balanced program that works the core muscles in the back, as well as the front of the body. Sleeping in the fetal position also causes prolonged periods of stress on your psoas muscle.


You can perform a simple test to determine if you have a tight psoas. Lie on your back with both legs straight. Pull one knee towards your chest. If the other leg lifts off the floor, then your psoas is too tight. Now try the other side.


Regular gentle stretching is the best antidote for a tight psoas. Keep in mind that it will take time to release the psoas. The muscle has to be retrained, and you have to be consistent with the stretching. Be careful not to overstretch, which can cause the muscle to contract and shorten. Start your stretch slowly and ease into it without straining. You want to feel a lengthening sensation of the muscle.


Here are two simple psoas stretches you can try at home:


KNEELING LUNGE

Kneel on one knee, with the front leg forward at a 90-degree angle. With your pelvis tucked, lunge forward, easing into the stretch without straining. If your psoas is tight, your natural tendency may be to arch your lower back; make it a point to keep the back straight. Raise your arms overhead for an added abdomen stretch. To dynamically stretch the psoas, complete 20 reps on each side, holding the lunge for 2 to 3 seconds.


WARRIOR YOGA POSE

Step one foot 3 to 4 feet in front of you. Lunge forward until your front knee is at a right angle. (Readjust your foot position if necessary.) Turn your back foot out about 45 degrees. Keeping your back foot firmly planted, and your head, shoulders, hips and knees facing forward, raise your arms overhead. Relax your shoulders; don’t let them inch up. Lift your rib cage away from your pelvis to really stretch the psoas. As in all yoga poses, breathe deeply and easily. Don’t strain. Hold for 30 to 60 seconds.


Other tips to keep your psoas in top shape include:


1.    Sitting less — Try to get up every 45 minutes, at least. If you are traveling long distances, stop every 3 hours and stretch or walk for 5-10 minutes.

2.    Reach for support — Add support to your car seat by using a rolled up towel or small pillow behind your lower lumbar spine.

3.    Professional massage — Massage can help relieve a tight psoas, although this type of massage is not always comfortable.


By consistently working to relax the psoas and gradually restore its length, you will help reduce lower back pain, hip pain, groin pain, buttock pain and tight hamstrings, as well as prevent future injury.


Pathways to Healing specializes in holistic chiropractic care. Dr. Alyssa Musgrove draws on a variety of techniques, including chiropractic, kinesiology, nutrition, food allergy testing and lifestyle counseling to assist clients in achieving optimal health and wellness in one setting. Pathways to Healing is located at 1022 Founders Row, Lake Oconee Village, Greensboro. The office can be reached at 706-454-2040.
Simple Steps to Improve Balance and Prevent Falls

By: Dr. Alyssa Musgrove – Pathways to Healing

Here are a few sobering statistics: One in three adults over the age of 65 has a serious fall each year. About 20 percent of women who fracture a hip become permanently disabled and another 20 percent die within a year.

While the elderly population is more prone to falls that can lead to serious complications, balance is important for all ages. Balance training can benefit everyone – whether you are older and want to improve basic day-to-day function or an athlete wanting to enhance performance and prevent injuries. With balance, it’s always best to be proactive. If we work on enhancing our balance and stability now, we can help prevent serious falls and injuries later.

The key to maintaining our balance is staying active. By staying active and continuing to challenge our balance, we can improve our overall stability. While improving balance will certainly help protect you from falls, it also can help improve overall mobility and fitness, while also allowing you to maintain independence and complete daily activities with ease.

Below are six strategies you can begin incorporating into your daily routine to help strengthen the muscles that keep you steady on your feet.*

1. Incorporate simple exercises. The following exercises help strengthen the core and lower-body muscles, which are critical for stability.

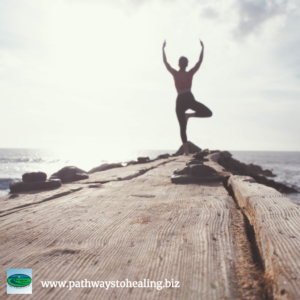
* Exercise 1: This move helps improve one-legged balance. With feet together, pick up one foot with the knee facing forward or to the side. (Be sure to keep a stable chair or wall within arm’s reach for safety.) Hold the position with eyes open, then closed. Switch feet and repeat for four reps on each foot. You can also try to do this while you are washing the dishes. Once you can hold the pose for 30 seconds on each side, stand on a less stable surface, such as a couch cushion. To increase the challenge even more, do it with your eyes closed.

* Exercise 2: The same sobriety field test cops give drunk drivers also improves balance. Take 20 steps forward, heel to toe. Then walk backward, with toe to heel, in a straight line.

2. Strengthen those knees. Knee strengthening exercises, like leg presses and lateral movements with the arms, can help build strength. As knee strength builds, it helps improve proprioception awareness with the mind and body, and also allows you to continue a movement or action in place far longer with proper form.

3. Consider Tai Chi or Yoga. Studies show Tai Chi participants were less likely to fall than those who took part in basic stretching programs or made lifestyle changes. Yoga works, too: According to Temple University research, women 65 and older who took twice-weekly yoga classes for 9 weeks increased ankle flexibility and showed more confidence in walking. That last part is important, says lead researcher Jinsup Song, PhD, “because when people are fearful of losing balance, they tend to do less to challenge themselves.”

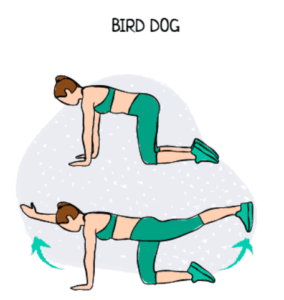
4. Work your core. This table top exercise increases core strength, which is directly linked to your balance. Using a mat to protect your knees, get on all fours on the floor in table top position. Make sure the back is flat and the neck is aligned with the spine. While looking at the floor, raise and extend your right arm and your left leg at the same time. Keep a tight core. Hold for 3–5 seconds and repeat on the other side. Perform 10 reps on each side.

5. Focus on the legs. Sturdy legs can help prevent a stumble from turning into a fall. To build quads, start with a simple squat: With feet hip-width apart, bend knees and hips and slowly lower yourself as if sitting in a chair behind you. Keep arms straight out, abs tight, back straight, and knees above shoelaces. Stop when thighs are parallel to the floor or as close as you can get, then contract the gluteal muscles in your buttocks as you stand back up. Aim for three sets of 10, with a  one minute break after each set.

6. Sleep more than seven hours a night. A study at the California Pacific Medical Center showed how sleep deprivation reaction time is directly related to falls. Researchers tracked nearly 3,000 older women and found that those who typically slept between five and seven hours each night were 40 percent more likely to fall than those who slept longer.

By incorporating these techniques, you should notice improvements in your balance, coordination, posture, core strength and agility. Most importantly, you’ll help prevent future falls and be able to maintain your independence for years to come.

*It is always important to seek expert training and support when possible. Work with a physical therapist or licensed trainer to ensure you are selecting the right exercises to help you reach your goals safely and effectively. If you have severe balance problems or an orthopedic condition, get your doctor’s clearance before doing balance exercises.

Pathways to Healing specializes in holistic chiropractic care. Dr. Alyssa Musgrove draws on a variety of techniques, including chiropractic, kinesiology, nutrition, food allergy testing and lifestyle counseling to assist clients in achieving optimal health and wellness in one setting. Pathways to Healing is located at 1022 Founders Row, Lake Oconee Village, Greensboro. The office can be reached at 706-454-2040.

Do You Have a Tech Headache?

By: Dr. Alyssa Musgrove

Technology offers many conveniences in terms of staying connected and entertained via small devices that fit in our pockets. But, unfortunately, as smartphones and gadgets get smarter, our posture gets weaker.

When we stand in proper alignment, the cervical spine (neck) and surrounding structures are able to support the weight of the head, which on average weighs about 10 pounds. When we look down at a phone, computer or electronic device (something we do on average between 2 to 4 hours a day), the neck is flexed forward and the weight of the head increases dramatically. In fact, a researcher by the last name of Hansraj evaluated the amount of pressure placed on the neck and shoulders when the head is at varying degrees. He concluded when the head is tilted just 15 degrees forward, it nearly triples the head weight to about 27 pounds felt on the neck and shoulders. At 45 degrees of tilt, head weight increases to about 50 pounds on the neck and shoulders.

“Text neck” and “tech headaches” refers to conditions caused by chronically holding your head flexed and forward, as we do when looking at our handheld devices. This new societal posture norm generates a tremendous amount of unnecessary stress to the posture system and, over time, is the culprit of many symptoms people experience on a daily basis.

Chronically maintaining a forward head posture can lead to muscle strain, headaches, neck pain, shoulder pain and TMJ (jaw) pain. Forward head posture can also cause disc injury, pinched nerves, early arthritic changes of the neck, numbness and tingling in the arms, hands and fingers. As the head moves forward and your upper back and shoulders become rounded and hunched, lung capacity decreases, resulting in shallow improper breathing that restricts the amount of oxygen reaching your tissues.

Here are several simple steps you can take today to avoid developing degenerative neck changes, muscle strains and pain from “text neck” and “tech headaches”:

Limit the time

Limit the amount of time you use your device. If you must sit for an extended period of time, take breaks to change your posture, move around and stretch. Develop a habit of taking a two to three-minute break for every 15 to 20 minutes you use your device or sit at a desk. Utilize your smart device to set automatic reminders and that will notify you when to take a break, stretch and reposition.

Raise the device

Elevate your device as close to eye-level as possible. (You can find holders for devices that make this possible.) Also, be aware of the placement of your computer screen. You should be able to look forward without looking down to view the screen. Simply lifting the computer screen to eye level will help maintain proper posture throughout the day.

Stretch

Chin tucks are a great exercise to stretch the neck. Move your chin backward towards your chest without moving it up or down and hold for five seconds as you feel a comfortable stretch at the base of your skull. You can also tilt the head to one side, bringing the ear close to the shoulder. You may use your hand to pull your head further into the stretch (best done while exhaling your breath), holding the stretch up to 20 seconds. You can also do the same thing while rotating your head from side to side to reach different muscles, repeating 3-5 times on each side.

A doorway can be helpful for stretching chest muscles. Place your palms flat against either side of the doorframe, with your shoulders and elbows at a 90-degree angle to your forearms. Lean forward until you feel a stretch in your pectoral muscles and hold for 30 seconds at a time.

Rest the head

If you sit at a desk for long periods of time, switch to a chair with a headrest and focus on keeping the back of your head in contact with the headrest, trying to keep your chin parallel to the ground and avoid looking down. You can also practice this while driving — focus on pressing the back of your head on the headrest in the car and bringing the shoulders back.

Be aware of pain

Use pain as a warning sign to check yourself. Experiencing pain in your neck, burning between the shoulder blades, numbness or tingling in the arms or frequent headaches is your body’s way of telling you to act quickly and make a change. Pay attention to these warning signs and take action before a more serious permanent issue arises.

If your symptoms do not improve after incorporating new posture methods, stretching and reducing the time spent on handheld devices, then it may be time to seek help from a qualified professional. Chiropractic adjustments can help relieve joint pain, reduce tight muscles and promote posture habit re-education. The sooner you seek treatment, the more likely it is that you will have success in treating the problem and keep it from progressing to permanent damage.

Pathways to Healing specializes in holistic chiropractic care. Dr. Alyssa Musgrove draws on a variety of techniques, including chiropractic, kinesiology, nutrition, food allergy testing and lifestyle counseling to assist clients in achieving optimal health and wellness in one setting. Pathways to Healing is located at 1022 Founders Row, Lake Oconee Village, Greensboro. The office can be reached at 706-454-2040.